
Capture the best shots and metadata with our GStreamer PoC

Written by:
Diego Nieto2023年10月26日
What is this about?
We had to develop a proof of concept in one of our latest Consultancy projects. That PoC gives the client a simple but valuable tool to perform the following actions:
- Include the camera metadata in the snapshots.
- Get the sharpest frame in a window of N possible.
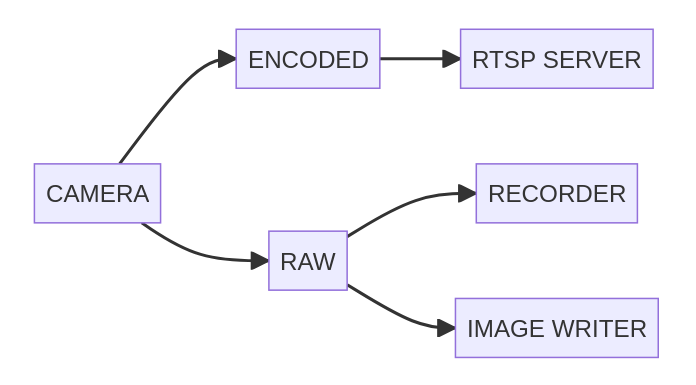
But how these two actions are integrated in the PoC? Well, the PoC consists of a set of GStreamer elements that are interconnected between them. Let's describe them one by one:
- Video capture: in this case, we rely upon an element called "nvarguscamerasrc" to obtain the stream
- Video recorder: it's capable of starting/stopping recordings and saving the result as a file
- Video server: it's offering the encoded video through a local server
- Image writer: it's where we are putting most of the effort for this project
- nvarguscamerasrc: it's an element we've modified to embed the camera metadata into the GstBuffers.
Better with an image? Let’s see.
One by one
Let's go deep into each element till we get the whole picture. As mentioned, the Camera is a GStreamer element based on an NVIDIA public resource: nvarguscamerasrc. Depending on the version source, this element provides a raw video source in at least NV12 color format, but others like P010_10LE might also be available. We'll use NV12 for our use case. We added a custom layer to embed metadata into the frames.
The RTSP server element is part of PoC because it must keep working with the other GStreamer elements but does not need further development. It receives the encoded stream and provides it through RTP packets. The same happens with the Recorder. It gets the raw stream the Camera offers and saves the video according to start/stop actions.
Last, the Image writer takes place when the client takes a snapshot. Together with Camera development, most of the work is based here. The raw stream is constantly being pushed to this element, but only when a snapshot is triggered the image processor starts working.
Adding context to the view
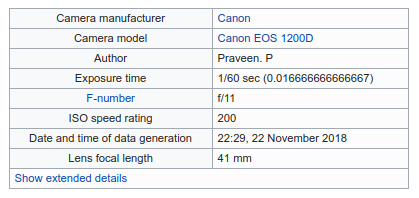
Metadata, EXIF, context. When watching a picture, it is sometimes helpful to know some of the properties that belong to it. Those properties can give us context about the place, city, brightness, and camera settings. EXIF (Exchangeable Image File) is a standard format for storing interchange information in digital photography image files.
Let's have a look at an image with its EXIF metadata:
The above are common properties saved into the picture known as EXIF metatada. ISO, exposure time, brightness, and other properties let the user understand how the snapshot was taken. For our use case, these are part of the properties required by our client:
|
NAME |
DESCRIPTION |
|
Scene Lux |
Scene brightness for this capture (in lux). |
|
Sensor Exposure Time |
Sensor exposure time for this capture (in nanoseconds). |
|
Camera model |
Camera model. |
|
Image Orientation |
Image orientation was used for this capture. Useful for understanding the captured object position. |
|
Image Timestamp |
An Image timestamp was used for this capture. It is useful when several images might be taken of the same object. |
Once we have cleared the requirements, it's time to connect the elements. The nvarguscamerasrc is an NVIDIA GStreamer element library that provides camera capture through continuous buffers. Those buffers can be enriched with the metadata.
We read those parameters through the Libargus Camera API for our use case, explicitly using the Argus::ICaptureMetadata interface. Then, we embed those parameters into a new structure that handles whether the frame has metadata and which is that metadata.
Luckily, v4l2_argus_ctrl_metadata already exists to provide storage for those required attributes and others. So, combining structure and saving those attributes with the buffer aside is a matter.
Embedding the now the metadata is simple. Calling gst_buffer_add_meta() with the buffer and our new structure as parameters is enough.
Sharpness is everything
How useful is it to take a snapshot with blurring? This section is about choosing the sharpest image in a range. Imagine the following: we are capturing a video at 30fps of an object, and something interesting appears, so we decide to take a snapshot. What happens if, in that moment, the camera moves? What if we process the N following ones and choose the best instead of taking the first one after pressing the button? This is the approach taken here.
There are many methods and tons of papers to detect edges on the images. Canny, Sobel, and Laplacian are well-known ones. While Canny is the most effective and commonly used, Laplacian is quicker and enough for our purpose. It is based on a convolution of one of the following kernels:
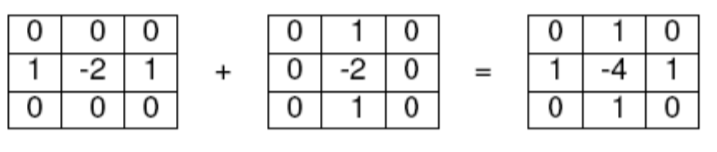
Laplacian discrete operator is a second-order derivative filter, so the matrix on the right is the sum of the finite difference of those differences' vertical and horizontal equations.
When we apply a convolution with the above kernel, the result is that it removes each pixel's weight four times by adding the pixel values on the right, left, up, and down. Other standard kernels are also applied that also consider the corners. However, we will use the described above.
After applying a convolution in a grayscale image with that kernel, we can see how the edges are highlighted:
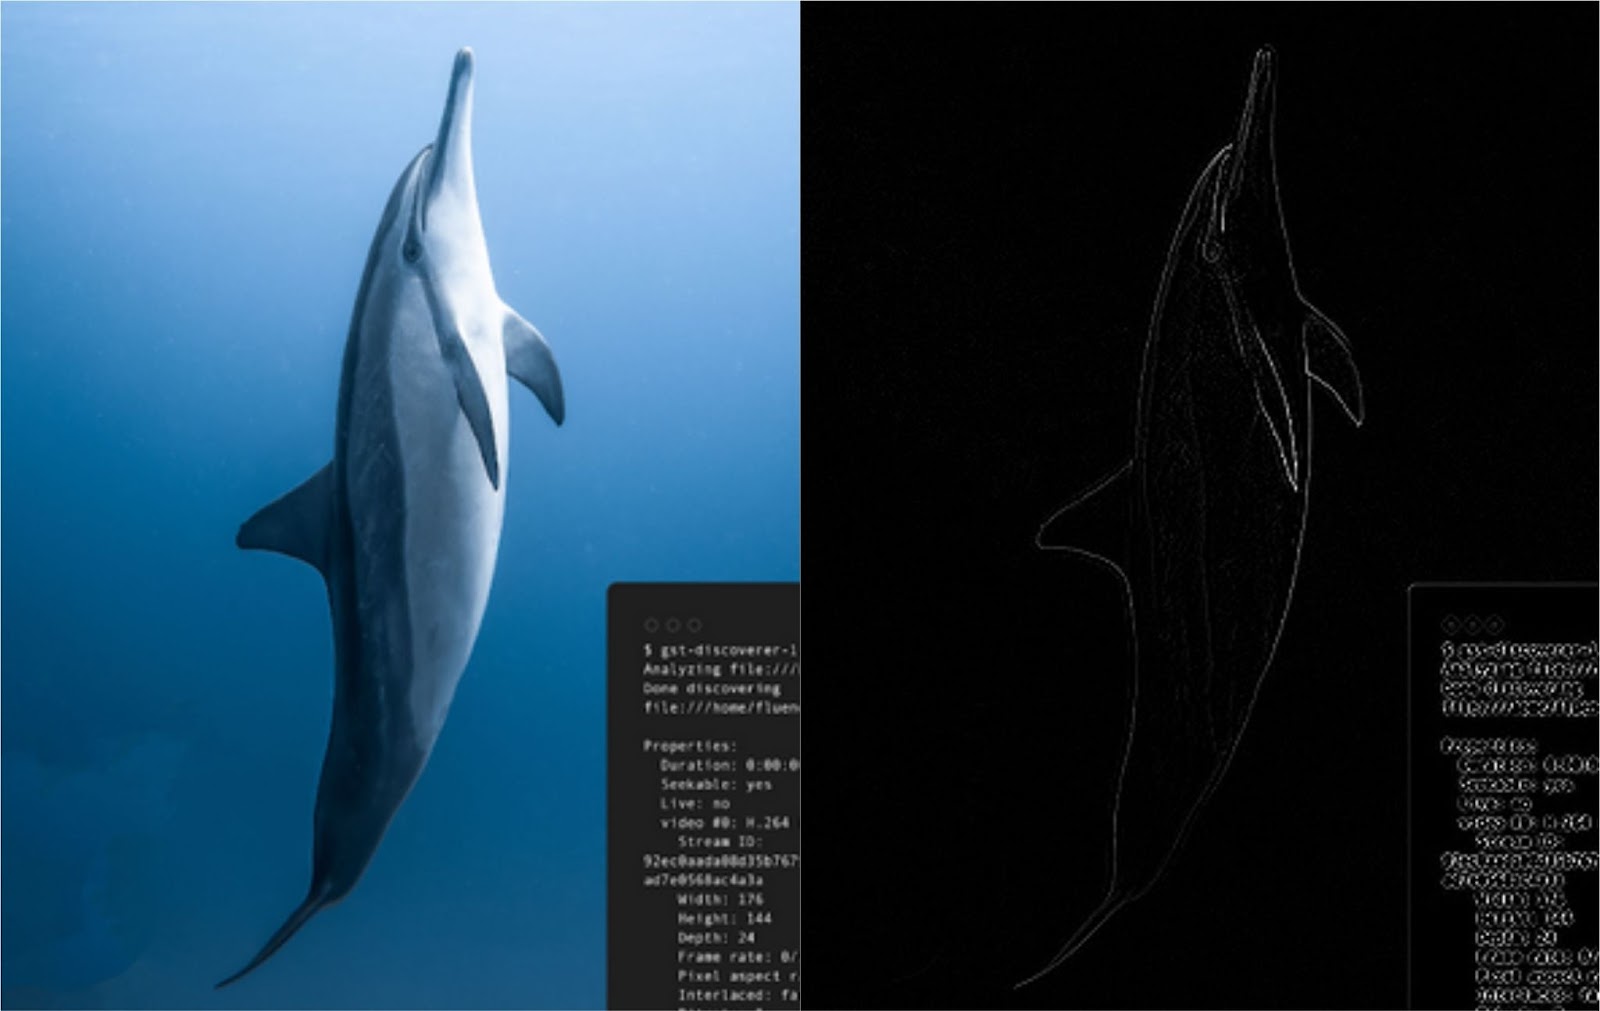
What to do now with those images? The answer is to get the image variance.
In those images where edges are clearly highlighted, the variance between the mean and each position would be more significant so that the variance would be greater. Now, we have a way to score the images.
Check out the graphs of the squared difference from the mean of the Laplacian in the previous image. On the left, we have the results with the image. On the right, we blurred the same image before applying Laplacian:

The score for the same image, the one not blurred, is higher than the blurred one before applying the Laplacian method.
Putting all together
The pieces are all ready to work and produce the PoC desired. We need to connect the chain in the following way:
-
Receive GstBuffers from the Camera capture but do not process them
-
Whenever the user triggers the snapshot, start storing N GstBuffers
-
Wake up the worker thread to start processing the frames
-
The worker thread starts doing the following tasks for each frame:
-
Convolution in GPU
-
Variance in GPU
-
-
Return the frame score and compare it with the previous one
-
Read the metadata added in the nvarguscamerasrc layer in the GstBuffer
-
Save the snapshot with the highest score

Final results
Based on nvarguscamerasrc, our solution outputs NVMM memory (GPU memory), which is around three times faster than the CPU solution. It has an average execution time of 83ms, while the CPU takes around 262ms in a Jetson Nano machine. The memory transfers are not included, so it is even more optimistic.
Whether you're ready to capture stunning shots and unlock valuable metadata, or if you need assistance with any other project, don't hesitate to contact us here!

